
How to do eyeshadow for beginners is mostly about placement and blending control, not owning a huge palette or doing complicated cut creases. If your shadow turns muddy, skips on the lid, or disappears after an hour, you’re not “bad at makeup”, you’re usually missing one small prep step or using the wrong brush for the job.
This guide keeps it practical: a minimal starter kit, a quick “eye map” so you know where shades go, and two beginner looks you can repeat without overthinking. I’ll also flag the mistakes that waste the most time, because beginners often do more work than needed and still feel stuck.
One more thing, eyes vary a lot: hooded lids, deep-set eyes, monolids, and mature skin all change where you place color. You’ll see options for that too, so you can adapt instead of copying a tutorial that wasn’t made for your eye shape.

What beginners usually struggle with (and why it happens)
Most “bad eyeshadow days” come from a short list of issues. Once you know which one you have, fixing it feels almost unfairly easy.
- Patchy color: often from oily lids, leftover skincare, or placing shadow on bare skin with no base.
- Harsh lines that won’t blend: usually too much product on the brush, or using a brush that’s too dense for the crease.
- Muddy results: mixing too many shades, or layering dark colors before your transition shade has room to breathe.
- Fallout under the eyes: powder formulas plus loading the brush heavily, or tapping off too late.
- Creasing or fading: lids get oily on many people, and some formulas need primer or a set base to stay put.
According to the American Academy of Dermatology (AAD), cosmetics can sometimes irritate sensitive skin, so if you notice itching, swelling, or persistent redness, it’s smart to stop and consider checking with a dermatologist, especially around the eye area.
A simple self-check: which “beginner problem” is yours?
Pick the closest match. Don’t diagnose every issue at once, it’s easier to fix one variable and retest.
- Your shadow disappears by lunch: you likely need primer, or you’re not setting your base.
- It looks great until you blend, then it goes gray/brown: you’re probably over-blending or stacking too many mid-tones.
- One eye always looks higher: your crease placement is uneven, or you’re matching your brows instead of your eye shape.
- The outer corner looks “droopy”: your dark shade placement is too low, or your wing direction fights your natural angle.
- Shimmer looks chunky: brush isn’t the right tool, or the lid isn’t prepped for metallic texture.
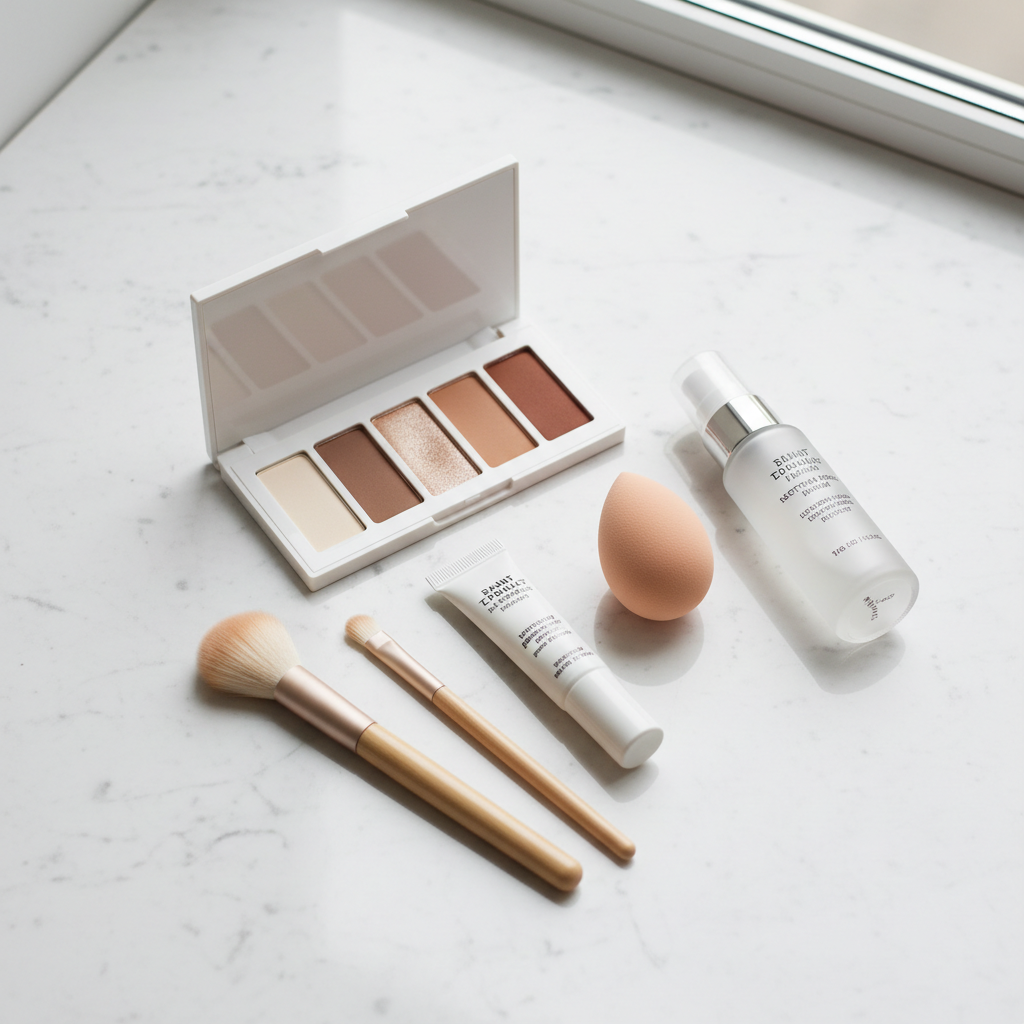
The beginner eyeshadow kit: what you actually need
You can do a lot with less. For how to do eyeshadow for beginners, the goal is a kit that teaches control, not a drawer full of options.
Minimum products
- Neutral palette with 1 light matte, 1 mid-tone matte, 1 deeper matte, 1 shimmer
- Eye primer or a thin layer of concealer (primer often grips longer on oily lids)
- Translucent powder (optional, helpful for smoothing blending edges)
- Setting spray (optional, useful to intensify shimmer)
Minimum tools
- Fluffy blending brush for crease and edges
- Small shader brush for packing color on the lid
- Small pencil brush for outer corner detail or lower lash line
Key point: a fluffy brush blends, a flat brush places. When beginners swap those jobs, the result gets patchy or messy fast.
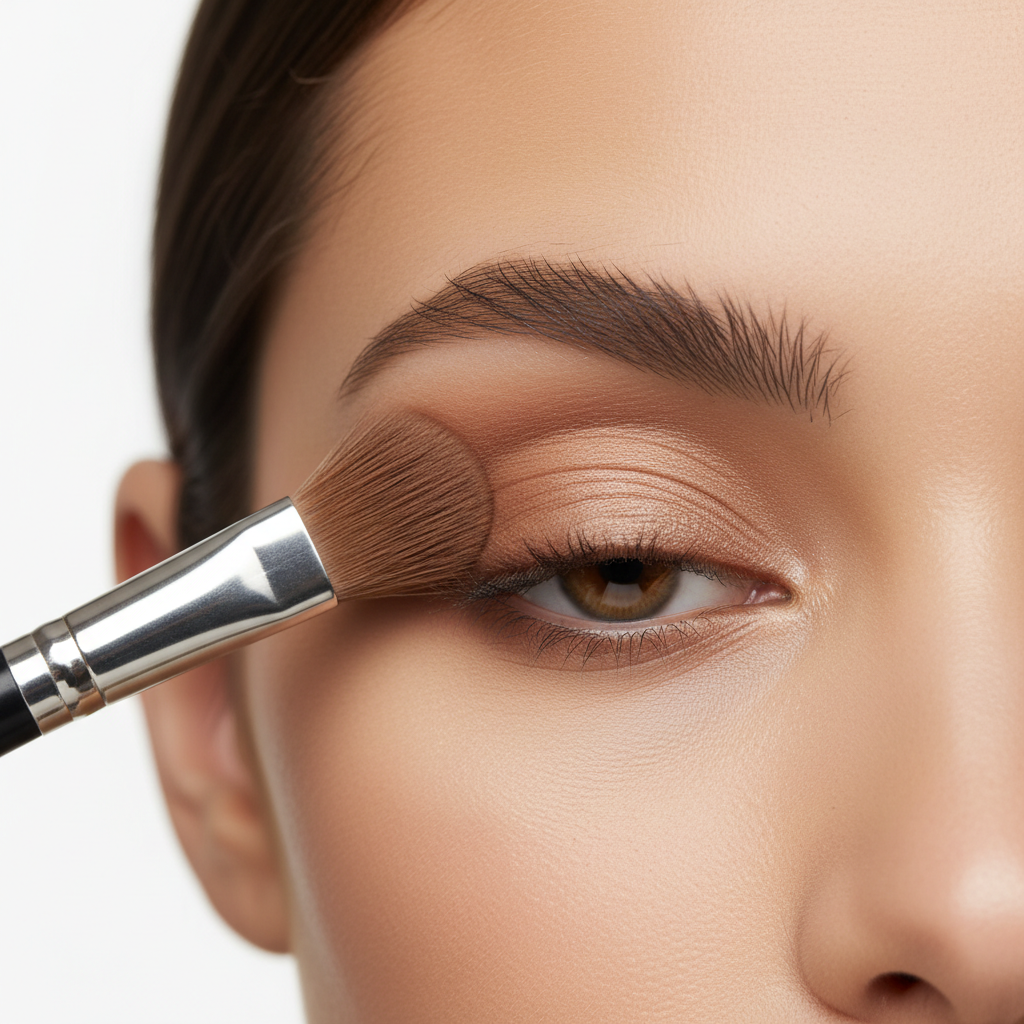
The eyeshadow “map” you’ll reuse forever
Here’s the simplest mental model. If you remember only this, you’ll look like you know what you’re doing.
- Lid: the mobile lid where shimmer or your main color sits
- Crease: the fold area above the lid where transition shade goes
- Outer corner: where depth goes, kept slightly higher than you think
- Brow bone: a light matte to soften edges, not a sparkly stripe
- Inner corner: tiny highlight point for awake-looking eyes
If you have hooded eyes, your “crease” often sits higher than the fold you see when your eyes are open. In practice, you place transition color a bit above the fold so it shows.
Step-by-step: the easiest everyday look (3 shades, 8 minutes)
This is the workhorse look. If you’re learning how to do eyeshadow for beginners, repeat this until your hands stop hesitating.
1) Prep so the shadow has something to hold onto
- Apply a thin layer of primer from lash line to just under brow.
- If your primer stays tacky, leave it. If it feels wet, lightly set with translucent powder.
2) Transition shade in the crease
- Use a fluffy brush with a mid-tone matte.
- Tap off extra, then sweep through crease with small motions, building slowly.
3) Lid shade
- Use a flat shader brush to pack a light matte or soft shimmer on the lid.
- For shimmer impact, lightly mist the brush with setting spray (don’t soak).
4) Outer corner depth
- Use a deeper matte only on the outer third of the eye.
- Keep the shape angled slightly upward toward the tail of your brow.
5) Clean up the edges (fast, not fussy)
- Blend the border with the clean side of your fluffy brush.
- If you overdid it, use a tiny bit of concealer on a small brush to sharpen the outer edge.
Two common variations: hooded eyes and mature lids
Many tutorials assume a lot of visible lid space. If that’s not you, the fix is usually placement, not buying a special palette.
If you have hooded eyes
- Place the transition higher: apply with eyes open, so you can see where color lands.
- Keep depth narrow: concentrate dark shade close to the outer lash line, then blend upward.
- Use smaller shimmer placement: keep shimmer mostly on the center of the lid to avoid emphasizing hood folds.
If you have mature lids or more texture
- Prioritize matte transitions: shimmer can look lovely, but heavy sparkle may emphasize texture in some lighting.
- Blend with less pressure: soft strokes reduce skipping.
- Choose satins over glitter: satin shimmer often looks smoother up close.
None of this is a hard rule, it’s just what tends to photograph and wear better in everyday life.
Quick reference table: where each product goes
If you freeze mid-application, use this as your reset. It’s also a good way to stop adding random shades when things feel “off.”
| Step | Product | Placement | What it does |
|---|---|---|---|
| Prep | Primer | Lid to brow bone | Helps prevent creasing and fading |
| Transition | Mid-tone matte | Crease area | Creates soft gradient, makes blending easier |
| Main color | Light matte or shimmer | Mobile lid | Adds the “look” without heaviness |
| Depth | Deep matte | Outer third / outer V | Adds lift and definition |
| Finish | Highlight (optional) | Inner corner | Brightens and opens the eye |
Common mistakes that make eyeshadow harder than it should be
- Starting with dark shade: it’s harder to correct, and beginners usually over-place it.
- Using too much product: tap the brush, then build. It feels slow, but it saves time.
- Blending everywhere: blending is not “rub until it disappears,” it’s softening edges while keeping shape.
- Skipping symmetry checks: look straight ahead, eyes open, then adjust outer corner height.
- Not cleaning fallout: if powder drops under the eye, sweep it away before concealer or it smears.
According to the U.S. Food and Drug Administration (FDA), eye-area cosmetics should be used as directed and kept clean to reduce contamination risk, so avoid sharing eye makeup and replace products that smell off or change texture.
When to get extra help (or change the plan)
If you keep getting watery, itchy eyes, or burning that doesn’t settle quickly, it may be irritation or an allergy, and it’s worth stopping and speaking with a healthcare professional. Also, if you have an eye condition or recently had eye surgery, it’s usually safer to ask your clinician what products are appropriate.
For technique help, a short in-store lesson or a session with a makeup artist can be useful when you’re not sure about your eye shape or brush placement. Sometimes ten minutes of feedback saves weeks of guessing.
Conclusion: your next practice plan (simple and repeatable)
If you want how to do eyeshadow for beginners to feel doable, repeat one neutral look until your blending feels automatic, then add one change at a time, like a brighter shimmer or a slightly deeper outer corner. Keep your kit small, check your placement with eyes open, and remember that most “messy” looks become clean once you stop adding more shadow and start refining edges.
Action step: try the 3-shade everyday look three times this week, and take one quick photo each time, you’ll spot progress faster than in a mirror.
FAQ
How do I do eyeshadow for beginners if I only own one palette?
You can still do a full look if the palette has at least one light shade, one medium matte, and one deeper shade. Use the medium as transition, the light on the lid, and the deep just on the outer third.
Do I really need an eyeshadow primer?
Not always, but many people do better with primer if their lids get oily or if shadow creases quickly. If you skip primer, a thin concealer layer plus a light dusting of powder can work for some formulas.
Why does my eyeshadow look muddy when I blend?
Usually too many shades in the same depth range, or blending while the brush still holds dark pigment. Wipe the brush, then blend edges with a cleaner, lighter touch.
What brushes should beginners buy first for eyeshadow?
A fluffy blending brush and a flat shader brush cover most needs. Add a small pencil brush later if you want more detail on the outer corner or lower lash line.
How can I make shimmer pop without fallout?
Press shimmer onto the lid with a flat brush or fingertip, and consider slightly dampening the brush with setting spray. Keep shimmer placement controlled, then clean any fallout before you do under-eye concealer.
How do I place eyeshadow on hooded eyes?
Apply transition shade slightly above the natural fold while your eyes are open, so the color shows. Keep deeper shades higher at the outer corner to avoid dragging the eye down.
What’s the easiest way to fix uneven eyeshadow?
Pick one anchor, usually the outer corner angle, and match both eyes with small adjustments. A tiny bit of concealer on a brush can clean the edge, then re-blend lightly.
Is it safe to use eyeshadow if my eyes are sensitive?
Sensitivity varies, and some ingredients or glitter particles may irritate. If you’re prone to reactions, patch testing and choosing gentler formulas may help, and persistent irritation deserves professional advice.
If you’re practicing and keep feeling like you’re “almost there” but the blending or shape still fights you, it can help to build a small routine around your eye shape and a starter palette you actually like using, a simple checklist plus the right brush pair often makes everything feel less random.